Cara Menambah RAM dan Mempercepat Performa Kinerja Android Bag. III - Melanjutkan artikel soal bagaimana langkah-langkah menambah ram android serta bagaimana mempercepat kinerja android yang sudah saya posting dua kali, kali ini bagian yang seri ketiga berbeda dengan seri-seri sebelumnya.
Pada
bagian pertama tutorial cara menambah ram android kita manfaatkan swap, overclock serta penambahan script di system. Swap nya sebagai virtual memory bukan swap untuk merubah memory eksternal menjadi internal. Tutorial pertama, lengkap.
Bagian kedua menambah ram android kita gunakan update zip sebagai installer untuk kita flash melalui CWM recovery. Namun sebetulnya installer tersebut masih dalam tahap pengembangan. Walau masih beta tapi terjamin android anda bakal meningkat 200% performanya. Sedangkan pada seri ketiga ini, kita hanya memanfaatkan aplikasi
third party.
Jangan salah, aplikasi pihak ketiga juga ampuh dalam menghemat ram supaya android tidak menjadi lemot dan sering lag. Terbukti beberapa hari ini saya mencari cara bagaimana supaya ROM Jelly Bean yang saya tanamkan di X10 Mini ini bisa berjalan smooth. Beragam metode sudah saya coba sampai akhirnya mentok di aplikasi third party.
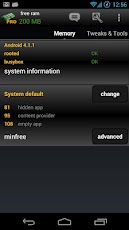
Coba bayangkan X10 Mini saya baru dihidupkan saja di menu info RAM nya 0,0MB. Setelah ditunggu beberapa saat nanti naik menjadi 1,7MB dan turun lagi ke 0,0MB. Parah kan? Sesudah saya pakai aplikasi yang namanya AutoKiller Memory Optimizer RAM android saya selalu diatas 50MB. X10 Mini memiliki kapasitas RAM sebesar 182MB. #Wow
Berikut ini akan saya sebutkan beberapa aplikasi penghemat ram (penambah ram dan penambah performa android) yang saya rekomendasikan untuk anda beserta penjelasannya dikutip dari Google Play :
 |
| AutoKiller Memory Optimizer |
AutoKiller Memory Optimizer
AutoKiller Memory Optimizer boosts your device and defends your battery at the same time!
Forget task killers! AutoKiller Memory Optimizer is not a regular task manager, it is an award winner memory (minfree) tweaker, it fine tunes android systems inner memory manager to keep your device fast over time. As a side effect it also lowers battery consumption. Also includes a manual process/service manager and a DashClock extension.
- - ROOT REQUIRED to set minfree values, unrooted devices will only have an emulation of this feature
- - if you have questions or you face errors please check home page or write a mail
- - for more details see home page http://andrs.w3pla.net
- PRO key app is available on the play store!
- Donators and PRO users receive additional features:
- - no ads
- - Chuck Norris mode enabled
- - apply kernel tweaks on boot
- - alternate preset (while screen is off)
- - all widgets
- - quick restart
- - memory reclaim
- - low intervals selectable for minfree emulators
*Aplikasi ini yang sedang saya gunakan. Sudah saya katakan diatas dibidang manajemen ram aplikasi diatas sangat baik kinerjanya. Mampu melegakan ram X10 Mini saya yang sebelumnya selalu 0,0MB.
 |
| Smart RAM Booster |
Smart RAM Booster
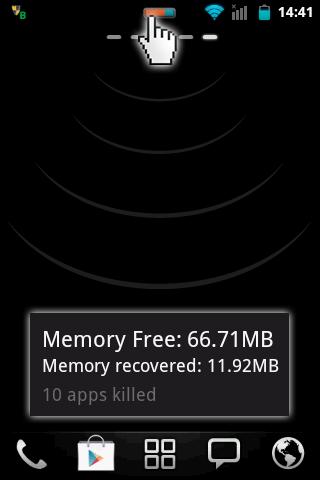
The most beautiful part of this app is a small, configurable widget that places on top of any app and one-click to RAM boost.
Recommended by AddictiveTips.
Hotest Apps by AppBrain.
Most of Android devices bundle with limited memory. Android task manager will selectively kill low priority tasks in order to reserve memory to higher priority task. That’s not always run at an appropriate time, causing low responsive apps, lagging, especially when you launch a new app after heavily browsing web pages. It causes a worse experience.
How RAM Booster works
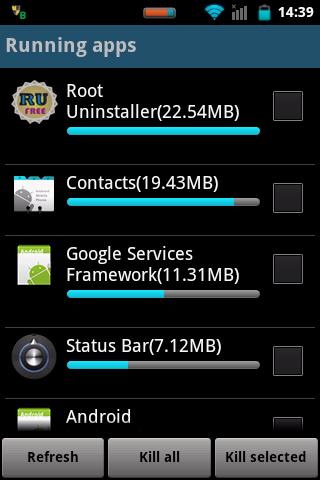
RAM Booster is designed to overcome these issues by selectively kill less important apps that are running in the background but consumes considerable device’s memory.
RAM Booster comes with auto-boost in 4 levels: aggressive, strong, medium, gentle.
- ☆ Aggressive: kill most of low priority apps
- ☆ Strong: Kill apps that is low priority as well as consume lightly below an “average”
- ☆ Medium: kill apps that consumes memory above an “average”
- ☆ Gentle: kill only apps that uses considerable memory
“Average” is evaluated real-time based on running apps and change over time.
How to work RAM Booster
There are 5 ways to boost
- ☆ Auto-boost: boost automatically under RAM available & timing conditions
- ☆ Overlay widget – Enable RAM Booster overlay widget (on by default), adjust widget’s position, and tap on widget to boost anytime you want
- ☆ Home screen widget – one tap to boost (long-press your home screen>Widget to add RAM Booster widget)
- ☆ Notification bar – one tap to boost (toggle notification bar visibility in app’s setting)
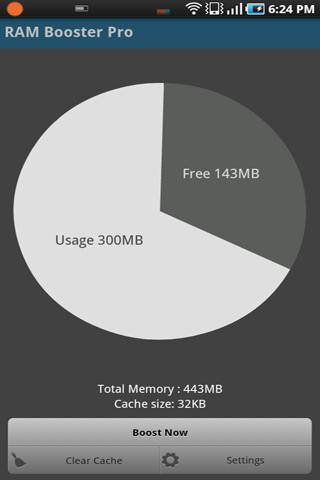
- ☆ Boost Now – tap this button from app’s main screen
- ☆ Kill app widget
- ☆ Running app manager widget (4x1, 3x1)
- ☆ Fast reboot widget
Tool:
- ☆ 1-click cache cleaner
- Supported languages:
- ☆ English
- ☆ Deutsch
- ☆ Español
- ☆ Français
- ☆ Polski
- ☆ Slovenčina
- ☆ Tiếng Việt
- ☆ ελληνικά
- ☆ Italiano
- ☆ România
- ☆ Türkçe
- ☆ فارسی, دری, تاجیکی
- ☆ Pусский
- ☆ Português
- ☆ Magyarország
- ☆ 日本語
- ☆ Nederlands
- ☆ 漢語 (Traditional)
- ☆ 漢語 (Hongkong)
- ☆ Català
- ☆ Hrvatski
- ☆ čeština
- ☆ Eesti keel
- ☆ Bahasa Indonesia
- ☆ Norsk
- ☆ ภาษาไทย
There are plenty options from app’s settings to twist boosting process:
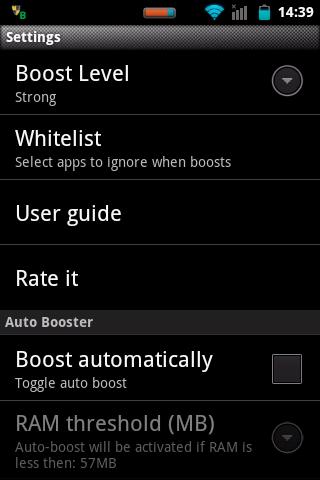
- ☆ Boost level: select a boost level
- ☆ Nice themes at your choice
- ☆ Whitelist apps: apps will not be killed when boosting
- ☆ Boost automatically: auto-boost, come with minimal RAM threshold and Boost interval
- ☆ Report style- define how to show reports
- ☆ Feedback- a haptic feedback when touch on boost widget
- ☆ Overlay widget position/size - Change overlay widget position/size
- ☆ Overlay widget transparency- Change transparent/opaque level
- ☆ OnClick/OnLongClick options for overlay widget
*Smart RAM Booster banyak direkomendasikan oleh beberapa situs yang membeberkan macam-macam aplikasi android penghemat RAM. Jujur belum sempat saya coba aplikasi ini namun sepertinya aplikasi ini memiliki fitur yang lumayan lengkap. Anda patut mencobanya.
 |
| RAM Manager |
RAM Manager
ROOT IS REQUIRED!!!
EACH ROOT USER MUST HAVE THIS APPLICATION!
IF YOU FIND A BUG OR IF YOU HAVE SOME PROBLEM, CONTACT ME BEFORE YOU GIVE LOW RATING, PLEASE.
This application optimizes the RAM of all android devices and improves the performance in all directions. We tested the best RAM balance which makes your system as fast as possible. Lots of running applications with enough free memory will not be a problem for your device. This is the best solution for all who have problem with the free memory, with the multitasking, with slow swapping between applications or with low performance.
ADVANTAGES OF PRO:
- ★No ads
- ★All features
- ★Widget
- ★Faster support
- ★More frequent updates
- ★You can support development
FEATURES:
- ★Balance - Option which makes your RAM to the best optimization, this option is for everyday using. Use this option when you want to have fast phone without lags.
- ★More free memory - This option is nearly the same as Balance, but this option should be advantageous for users who have more RAM than 512 MB. This option gives you more free memory but a bit reduces multitasking.
- ★More multitasking - This option is nearly the same as Balance, but this option should be advantageous for users who have less RAM than 512 MB. This option gives you more multitasking, but a bit reduces free memory.
- ★Hard gaming - Option which stabilizes your RAM for playing hardest games. Use this option for games which lag on your phone. Your games will run smooth without lags.
- ★Hard multitasking - Option for users which are really hard working on their phones. You can have a lot of running apps and quickly switch between them without lags.
- ★Default (Samsung) - Default settings by Samsung, these settings are also used by LG, HTC, etc.
- ★Default (Nexus S) - Default settings which are used by all Google devices.
- ★Default - This option reverts your RAM to your default settings, which you had before you installed this app.
- ★Set on boot - Saves all your settings on boot
- ★Lock launcher in memory - Prevents restarting your launcher
- ★Kill all apps - Cleans your memory
- ★VM Heap size - It is a maximal size in MB which application can use for its data
- ★Swap file - Improves a performance but may degrade your SD card life
- ★Memory info - Shows informations of your memory
- ★Memory graph - Shows your free and used memory
- ★Widget (Light or dark theme)
- ★You can switch between all options without rebooting
- ★Languages - English, Czech, Slovak, Korean, Italian, Croatian, Polish, French, Russian, Greek, Chinese
*Ini aplikasi yang dulu sering saya gunakan dalam pengoptimalan RAM android. RAM Manager yang merupakan salah satu aplikasi penghemat RAM terbaik adalah aplikasi yang dibuat oleh JUWE11. Mungkin saja JuweRAMScript yang sering saya bahas ditutorial bagian pertama itu ya merupakan script yang serupa dengan RAM Manager :D kan di RAM Manager ada banyak preset yang bisa kita pilih. Silahkan mencobanya sendiri.
Itulah beberapa aplikasi penambah dan penghemat ram serta peningkat kinerja ponsel android. Semua aplikasi diatas work di android versi 2.1+ (Eclair keatas).
Baca
Cara Menginstall Aplikasi Android Melalui PC. Untuk link download diatas kalau tidak salah ada yang PRO. Jadi anda harus membayar beberapa dollar untuk mendapatkannya. Tapi tenang. Di google banyak versi PRO yang bisa diunduh secara gratis :)
Next : Cara Root Sony Xperia Neo